Inspektlabs' Loop For Building The Part Detection Model | Inspektlabs
This post is in continuation of our analysis of car damage detection and part identification using AI. This post will cover the precise MLOps loop architecture that enables us to generate highly accurate results for part detection.
This post will discuss our technique to establish a loop for building the part detection model. We begin with an introduction to the model we employ and the datasets we utilize. We go over the MLOps loop architecture and the intricacies behind it. Then, we cover the parameters and techniques used to optimize the loop architecture. Lastly, we cover the areas that still have scope for improvement and how we can make such improvements before concluding.
Introduction
This post is in continuation of our analysis of car damage detection and part identification using AI. This post will cover the precise MLOps loop architecture that enables us to generate highly accurate results for part detection. The technique that allows us to distinguish different objects in an image during the car inspection process is semantic segmentation. In the Dataset, we used 34 classes (without background) which consist of 24 Major and 10 Minor parts. This Dataset has part labels and tags about car angle, zoomed-in, highly damaged, etc., and we can analyze the model using this. The images in our Dataset are a mixture of in-house and client-sourced assets. However, the labeling of the images is performed entirely in-house.
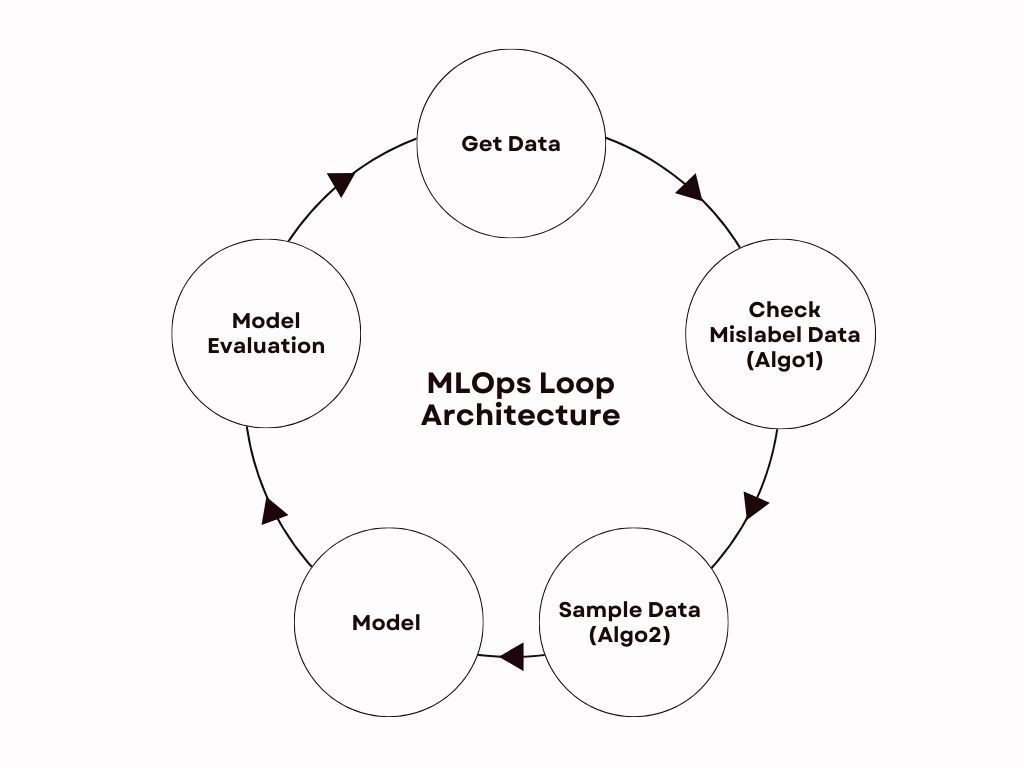
MLOps Loop Architecture
MLOps is the process of deploying and maintaining ML models in production reliably and efficiently. Why Loop? Because this process repeats, i.e., it needs new data to learn and uncover insights, we need to imagine the process as a loop. The process starts again as new data flows in, forming a continuous circle of model training. This is the basic architecture of MLOps, and we have modified it according to our problem. We had access to the Dataset, but some of it was mislabeled, so we have added this process to it. Furthermore, sampling was also added by us because while training on any data, the model was not giving good results.
The Architecture is represented and described below:

Get the data –> Checking mislabeled data (algo1) –> Sampling of data (algo2) –> Training on Sampled data –> Model evaluation –> Again, get the data and use this model in algo1 and algo2.
During the process, the data is static (750k), and we add 45-60k data in each loop. In each loop, we take a new dataset non-repeated from the original 750k. This process repeats over and over again. The loop started giving a result from Loop 1 itself, but it was not that good, and from Loop 3, it started giving better than the benchmark. Here, the benchmark is the model which Inspektlabs is currently using. We have run this loop to Loop 9, using more than 300k data on the loop. Out of this, it has sampled 150k data, and the final model was trained on this 150k data in Loop 9. Now, let us take a deeper look at the different elements of the process.
- Mislabeling of Data - While labeling large datasets, many errors can occur, including human errors. So to overcome this, we have developed a method for distinguishing between correctly labeled and mislabeled data. To identify mislabeling of the data, we had to go through a lot of data and see what types of mislabeling were there in our Dataset. Then, we tried to solve those problems using some logic-based algorithms.
While building this loop, we had to go through the Dataset manually and analyze what type of mislabeling exists in our Dataset. Based on this, we created our algorithm to identify mislabeling of data which is an automated process now. Finding mislabeling in data takes 20 hrs to run on 60k images, and the whole loop (including mislabeling, sampling, and training) takes two days. We used 300k Dataset and 150k sampled from them, which is the training Dataset.
- Sampling of Data - Sampling data from the Dataset is an essential part of this loop. If we train on too much data without sampling it, the model will not give results because the proportion of the different data types is not the same.
- One type of data might be trained more times, but the model does not need that information again. So, that means the model is giving unnecessary attention to this type of data.
- Similarly, one type of data might be trained fewer times, but the model may need more of this type of data, and the model is not giving much attention to it. Also, sometimes models get confused by having more data while training.
We have experienced these same issues while training on complete data, and many problems can occur if we do not sample the data. There is no exact number or threshold for this.
- When we have more data, then most of the data gets repeated. In such cases, the model focuses too much on that data and gets overfitted. If there is too much data, the model takes more time to train. This is problematic because the model mostly gives results on the training data only but does not give results on the new data, which the model has not seen yet.
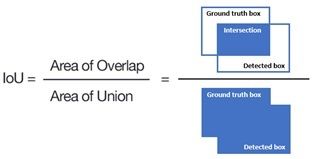
- The data sampling is done using some features/properties, also referred to as tags (elaborately discussed below), of the image. For this, we have created one algorithm to determine for which data the model is not giving a good IoU and add those images to previously used data. E.g., a black car with reflection may not give a good IoU.
- Here, IoU means Intersection over union: The Intersection of the ground truth and prediction/Union of the ground truth and prediction. It depicts the number of common pixels in the ground truth and the predicted result/union of pixels in the ground truth and prediction.
Let us now analyze the tags:
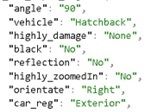
- Angle – This tag indicates the angle of the car. For example, 0° is the front view (hood) and a 90° side view on both sides (doors, window glass), and 180° is the back view of the car (dicky). We have 0°, 15°, 30°, ...,165°, 180°, etc. classes for angle.
- Vehicle – This tag indicates the vehicle type of the car. We have five different classes of cars: Sedan, Hatchback, SUV, Jeep, Truck, and Van.
- Highly Damaged – This tag indicates whether the vehicle is highly damaged. We have four classes that depend on the severity of damage in the car, i.e., damage level 0 (minor damage), level 1 (moderate damage), level 2 (highly damaged or missing part due to damage), and None (when there is no damage).
- Black – This tag indicates whether the car's color is black or not. Classes are yes or no.
- Reflection – This tag indicates whether the car's paint is reflective. Due to reflections, sometimes the car part does not appear clear in the image, and the model may be unable to identify a car part. Classes are yes or no.
- Highly Zoomed In – This tag indicates whether the car image is highly zoomed in or not.
- Orientation – This tag indicates the side of the car as it appears in the image (from the driver's perspective). This has three classes: left, right, and none, i.e., when cars in the image appear directly on the front or back view.
- Car Region (Exterior/Interior) – Using this tag, we discarded all images that were from the inside of the car or mainly showed the interior.
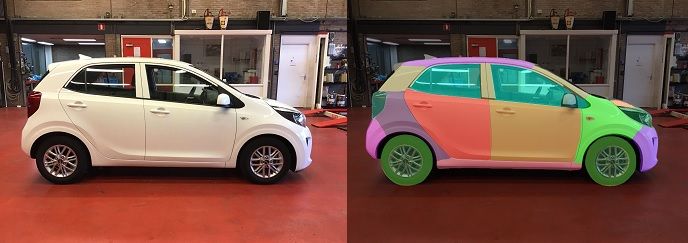
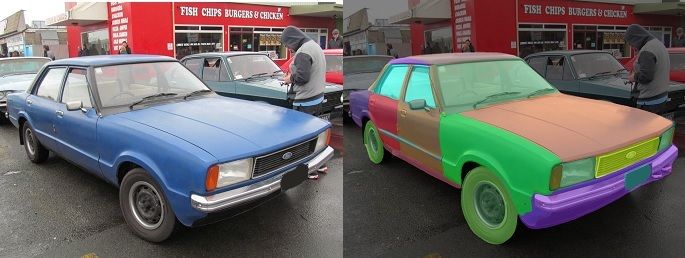
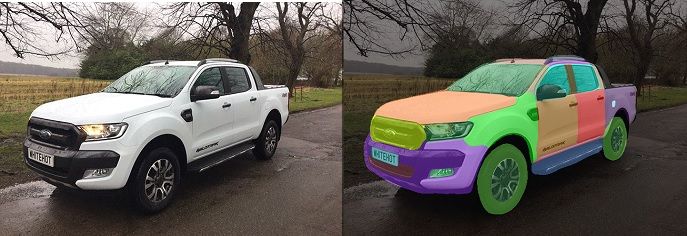
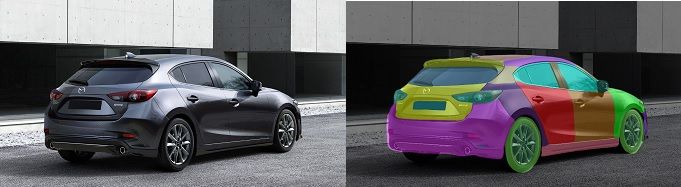
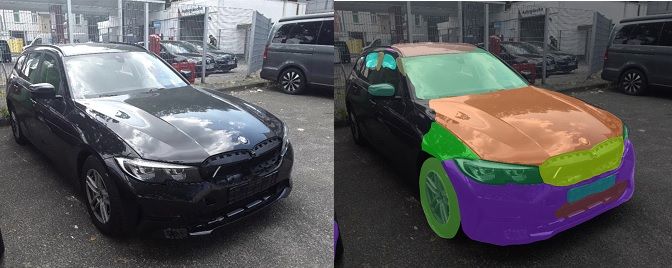
Let us consider a visual illustration. A processed car inspection image is depicted below, and alongside are the tags identified.

- Model Training and Experimentation - We used the K-Net model, which is based on Vision Transformers (ViTs), an alternative to convolutional neural networks (CNNs) for visual recognition. In model training, we did some experimentation and hyperparameter tuning. We have worked with some state-of-the-art models before, but they are all CNN-based models. K-Net is a ViT-based model, and these models are recent, so there are not many models for semantic Segmentation like DPT and KNet. When any model/algorithm is released, it is trained on some popular dataset where we can see which model is the best. According to that, KNet was one of the best models.
Furthermore, we did some experiments on this model and got very good results, so we opted for the KNet model. The vision transformer model uses self-attention. Here the model splits the images into a series of patches, which are processed by the transformer. It does so to understand the global and local features that the image possesses. Lastly, the Vit-based model has a higher precision rate in large datasets with reduced training time.
The Parameters and Techniques Used to Optimize the Loop Architecture
- Learning rate using Cyclic LR - Initially, we trained the model with a fixed learning rate then we used the cyclic learning rate. This rate is a tuning parameter in a machine learning algorithm that determines how much step size is required to get optimal results. It determines how fast or slowly we will move towards achieving a smaller loss value. The cyclical learning rate policy alters the learning rate after every batch of images. Using this, we get the optimal learning rate for our model and a considerable increase in model IoU. We got a 3-4 % jump on the IoU of the result from the fixed learning rate. Because in cyclic LR, the learning rate changes, and we get the result from different learning rates. So we can determine which learning rate is best for our model.
- Data Augmentation - Data augmentation is a technique that helps increase the quantity of data by adding slightly modified copies of pre-existing data or newly generated synthetic data from existing data. Data augmentation is a regularizer and reduces overfitting when training machine learning models. Overfitting means when the model gives good results on training data only but not on new images, which are not used in training. Regularization is a technique to prevent overfitting. In this scenario, we are doing augmentation, which acts as a regularizer to this model. By doing this, we get more different data types that are not present in the Dataset.
Data augmentation includes changing the angle, random cropping, flipping, and adding contrast and brightness to the images. This is a manual process. Here, we need to input which type of augmentation we need, and the model does it automatically. - Weighted loss – The weighted loss is used to tackle the common issue of imbalanced data and, in this case, an imbalanced number of pixels. In the Dataset, big parts like doors and bumpers have more pixels than reflectors and headlights and appear in more images. So, the model will give more importance to the parts which have more pixels. So, to give equal importance to all 34 parts, we did weighted sampling and added the weight to the loss. Weight sampling gives more weight to the class, which has less data, and it gives equal weightage to all the classes. This is an automated process.
- Loss Function - The loss function computes the distance between the expected output and the current output of the algorithm. In problems with multiple classes, like here, we have 34 classes (categories); we use categorical cross entropy because it calculates the loss for categories. Some alternative types of loss functions exist, but after experimentation, we settled on Categorical cross-entropy. We used Categorical cross-entropy as a loss function. We tried to train the model with different loss functions such as focal loss, dice loss, and their combination, but this gives no improvement in the result compared to cross-entropy.
- Optimizer - An optimizer is an algorithm or a function that modifies the neural network's attributes, such as learning rates and weights. We trained the model on the Adam and AdamW optimizers. The only difference is that AdamW uses weight decay to optimize the learning rate. Thus, it helps in mitigating the overall loss and improving accuracy. Here also after doing experimentation, we got good results in AdamW, around 5-7% more.
- Image size - Sometimes, increasing the image size while training also gives better results. We trained the model on a small image size at the start then we increased the image size, but this showed no such improvement in the result.
- Number of Iterations (Epochs) - After experimentation, we concluded that we have to run on 60k iterations to get the best result, which takes 24 hours. In each iteration, a new image or batch of images is passed to the algorithm in training.
The Results
If we had trained the model directly on 150k images (here, 150k are images used till now for training the model) only once, it would have given an inferior result than the loop we formulated. Because in the loop, we are adding a small chunk of data and training and using the previous loop results in the next loop. Owing to this model's accuracy, we are increasing the results loop by loop.
- The boundary of car parts in this model is very clear compared to other models we have used previously.
- Even if the results are not 100% accurate on the black and reflective car, the results have improved in these cases.
- The model IoU increased twice on the minor parts, giving good results on minor parts (like indicators, roof, side roof, etc.).

The Procedure
- At the start, we began with a 60k dataset. This data set is a subset of the primary 750k Dataset, and we pick a new 60k Dataset in each loop. After running a loop, our model sampled 11k images and trained the model on it.
- Further, we ran the same loop by adding more data, and it sampled a few more images.
- Then, we added this to 11k data, the previous loop data, and trained the model again. So using this, our model added only those data where the model is not performing well, and it improves the IoU. After each loop, we got improvement in IoU on the test dataset.
- After running each loop, we did some hyperparameter tuning, and experimentation on training the model because training the model on the right data gave good results, and we had to change some model parameters.
- Hyperparameter optimization or tuning is the problem of picking a set of optimal hyperparameters for a machine learning algorithm. Here hyperparameters are simply parameters used to train the machine learning model. We sometimes experiment by changing parameter values and seeing which parameter value gives the best result.
- We used the mean IoU, the Intersection over the union, for evaluation. This metric is mainly used in computer vision tasks to check the result. The main reasons behind the improved IoU are sampling images from the loop, weighted loss, using Cyclic LR, and adding more and more different types of data augmentation techniques.
Areas That Still Need Improvement
The current framework is sufficiently comprehensive for most cases. However, some areas still need improvement because the model cannot process specific images accurately. Let us consider some visual examples to understand better the areas that still leave some scope for improvement.
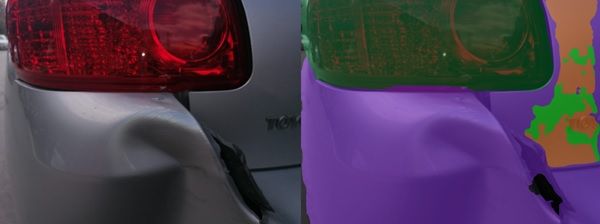
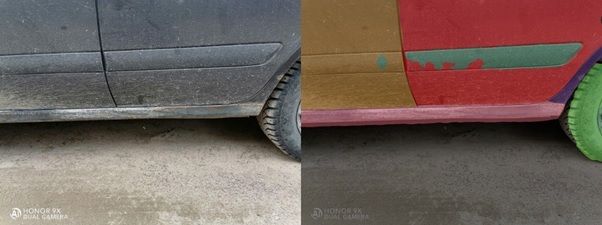
- On highly reflective black car images:
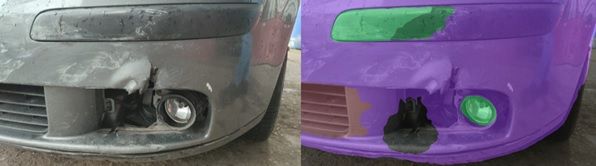
- On damaged cars, when the car panel's boundary is not clear:

- Some of the zoomed-in cases with some particular angles:
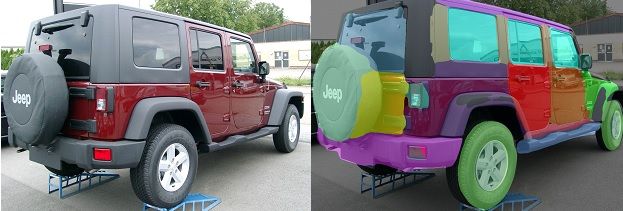
- A particular type of car which is not in the training dataset:

How Can We Address These Issues?
We can improve the results in such cases through specific techniques. While these issues exist, they are rather basic issues, and Inspektlabs has addressed them to a great extent. One approach is adding more data on black and reflective cars and data on cars with particular angles. We may need to manually add this data if we cannot figure out a method to sample it in an automated way. However, there are some cases where humans can not understand it through visual assessment. In such cases, the model is bound to fail.
Conclusion
Inspektlabs' vehicle inspection tool relies heavily on the part model framework to conduct an automated vehicle inspection. As you can see, the framework for the part model Inspektlabs deploys as part of inspecting a car is intricate and comprehensive. Although there are certain shortcomings in the current model, we are constantly working on improving it. The current model is highly functional and produces reliable and accurate results in most cases. As AI inspection technology and data quality improve, the model's results are bound to improve over time.